 |
| Teacher example oil pastel, liquid watercolor, and salt on watercolor paper |
I did this project with multiple classes with students' ages ranging from 6 to 10 years old.
Materials
- Oil Pastels
- Pencils and erasers
- Black Sharpie
- Foam brushes
- Liquid watercolor (blue and turquoise)
- Salt (regular and large ice-cream salt if available)
- Watercolor paper (any size you choose)
- White-board (if available)


The Process
I like to start this project on the white board. I have kids follow along on scrap paper. I show students two different ways to draw a turtle, the side and slightly foreshortened
"to reduce or distort parts of a represented object that are not parallel to the picture plane in order to convey the illusion of three-dimensional space as perceived by the human eye: often done according to the rules of perspective"
view and a simpler view showing the top of the turtle shell. After students draw both turtles on their scrap paper I have them choose which one they want to do for the project.
Side-view Turtle
For the more challenging turtle I start with the hump of the shell. Make sure students draw their hump towards the top of their page to leave plenty of room for the fins at the bottom.

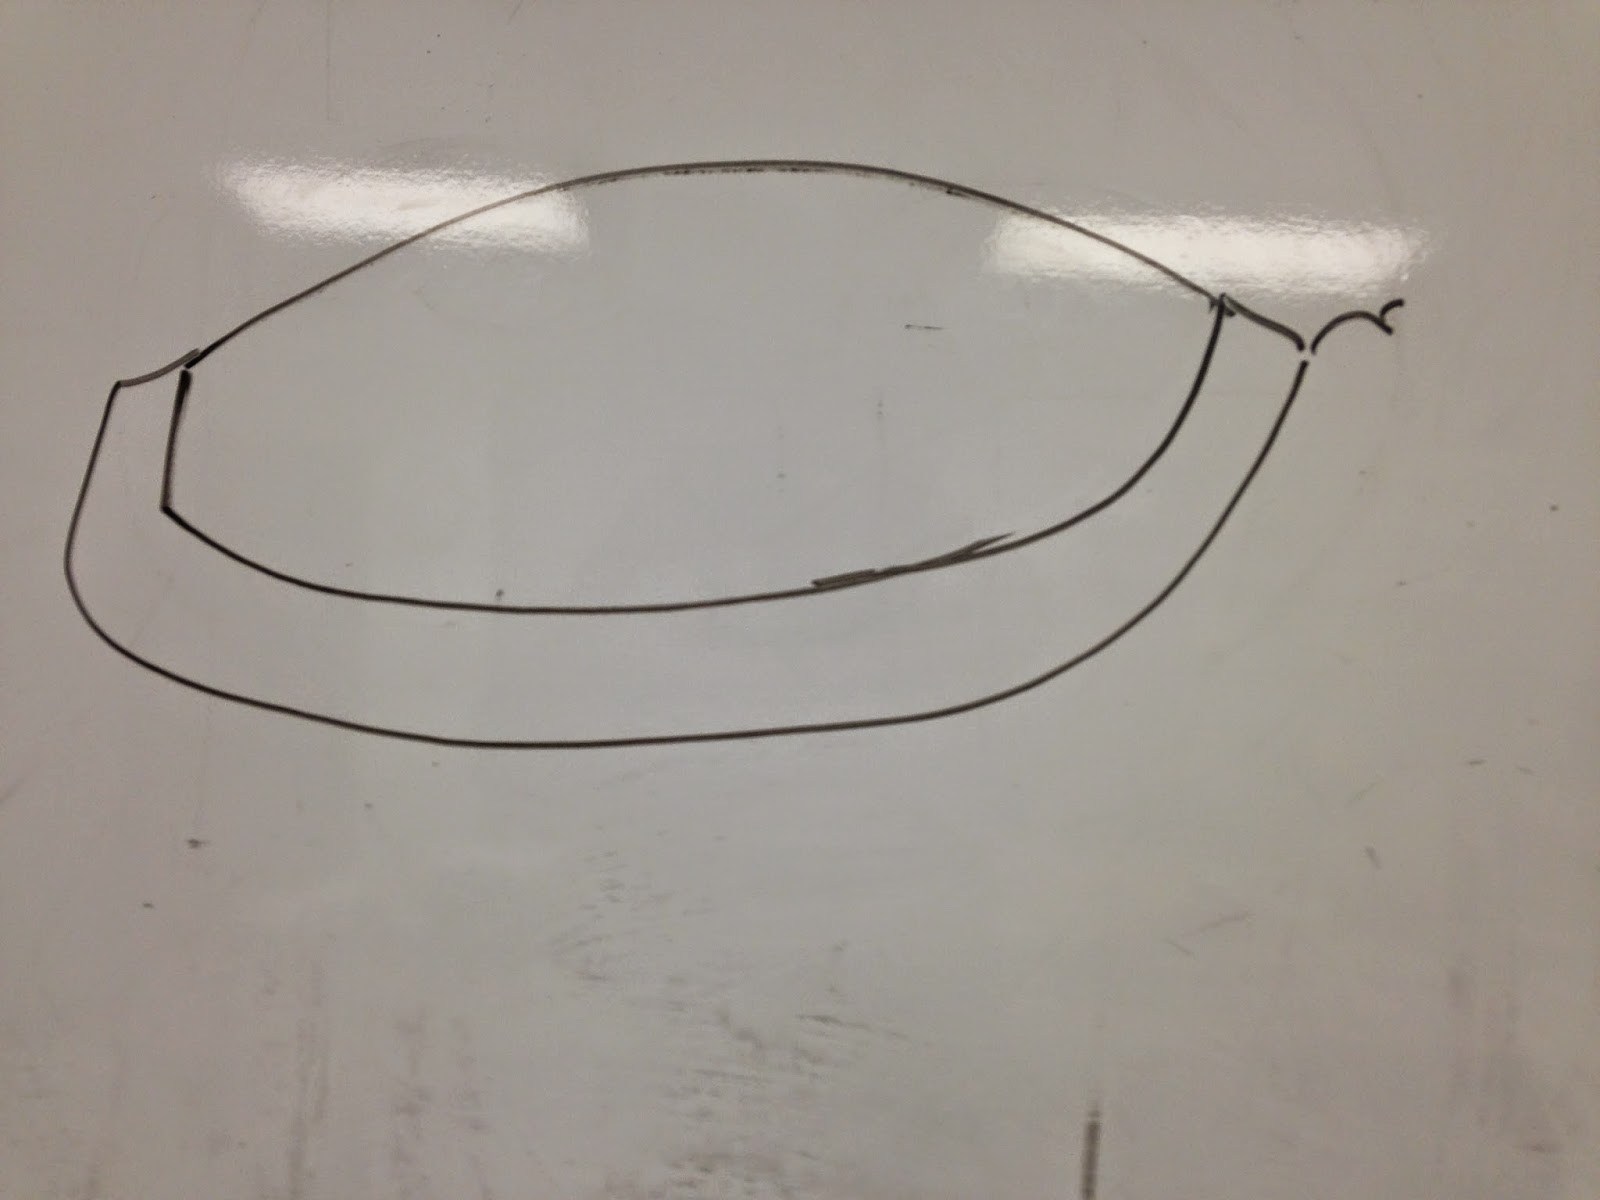
I then move on the the head and neck. I've found that the turtles come out stronger if you make the head somewhat rectangular.


Before getting to into the details I try to get the kids to draw every major body part first. I like to move onto the large fin, and then the underbelly. I explain to students that due to the foreshortened view the front fin will look a little large. I normally make a circle with a dark football shape inside for the eye.


Have some fun with the turtle's wrinkles and shell. It's natural, it's organic, so it doesn't have to be perfect.

Simple Turtle
 |
| a co-workers example |


Once students have made their selections I pass out the watercolor paper (cold-press). Students draw their turtles using pencil first and use their practice turtles as a guide. Then they trace over their pencil lines with black sharpie before moving on to the oil pastel. DON'T let students oil pastel the background if you are planning on using the liquid watercolor and salt.
 |
| Student work still in progress. 2nd grade |
Do a demonstration for students on how to use and blend oil pastels. Make sure that they know to go lightest to darkest in terms of color. a lighter shade of pastel drawn on top of a darker color does not have much of an impact.
In this example my co-worker laid down yellow first, then orange, then red.
On this particular turtle I laid down a light green first.

I then added some darker green lines on top of the light green radiating out from some corners of the shell section.

I then added just a touch of brown to the shell. I covered his body with peach with green accents and gave him brown spots with just a little black on his fins. Just a little blue on his underbelly is a nice touch as well. Have students experiment with color combinations on their scrap paper first, especially if you plan on letting them use unrealistic colors (pink, purple, etc)

On this turtle I used white first, then peach, then brown on the shell. I had several students that chose to follow this color scheme.

Once students have completely finished using their oil pastel they can move onto the liquid watercolor background. You may want to discuss resists, which is the incompatibility of two mediums (oil and water) that when used together in art can create layered effects with color and texture. Oil pastel is a great resist, though it can become a bit smudgy if not used carefully.
I like to set up a special station in the room for the watercolor and salt, as it can get a bit messy. I dilute the liquid watercolor by adding clear water. Usually around 50%. I also like to have kids use both blue watercolor and turquoise. This is just a preference though. I have students apply the watercolor using a foam bush. I also have them only do 1/4 of the paper at a time. The salt doesn't work as well if the paint begins to dry, so working a with a small section at a time cuts down on possibility of the paint drying before you are ready for salt.


You can have the students add the salt themselves (supervised) or do it for them. I like to add a mixture of regular table salt and larger ice-cream salt.

A little table salt sprinkled on damp watercolor paint creates a delicate bubble-like spot. Each crystal of salt chases away the pigment to make a lighter area beneath it. The larger the salt crystal the bigger the bubble.
The turtles turned out wonderful!
National Visual Arts Standards Addressed
1. Content Standard: Understanding and applying media, techniques, and processes
Achievement Standard:
Students
a. know the differences between materials, techniques, and processes
d. use art materials and tools in a safe and responsible manner
Georgia Performance Standards for Visual Arts Addressed
VA2PR.2 Understands and applies media, techniques, and processes of two-dimensional art processes (drawing, painting, printmaking, mixed-media) using tools and materials in a safe and appropriate manner to develop skills.
a. Creates drawings with a variety of media (e.g., pencils, crayons, pastels).
c. Creates paintings with a variety of media (e.g., tempera, watercolor).
d. Mixes colors intentionally to create specific new colors.
e. Mixes white with colors to create tints and black with colors to create shades (values).
No comments:
Post a Comment